Time Editing Tools in Ableton Live
the editing clipboard is the fundamental tool of all productivity software. functions like copy, paste, & cut save users an unimaginable amount of time as they make edits to a project. in ableton live, shift will modify most of these shortcuts to edit not only the contents of the selection but the block of time that contains them as well. a surprising amount of producers are unaware of these tools, but learning them can prove a watershed moment for speeding up one's workflow.
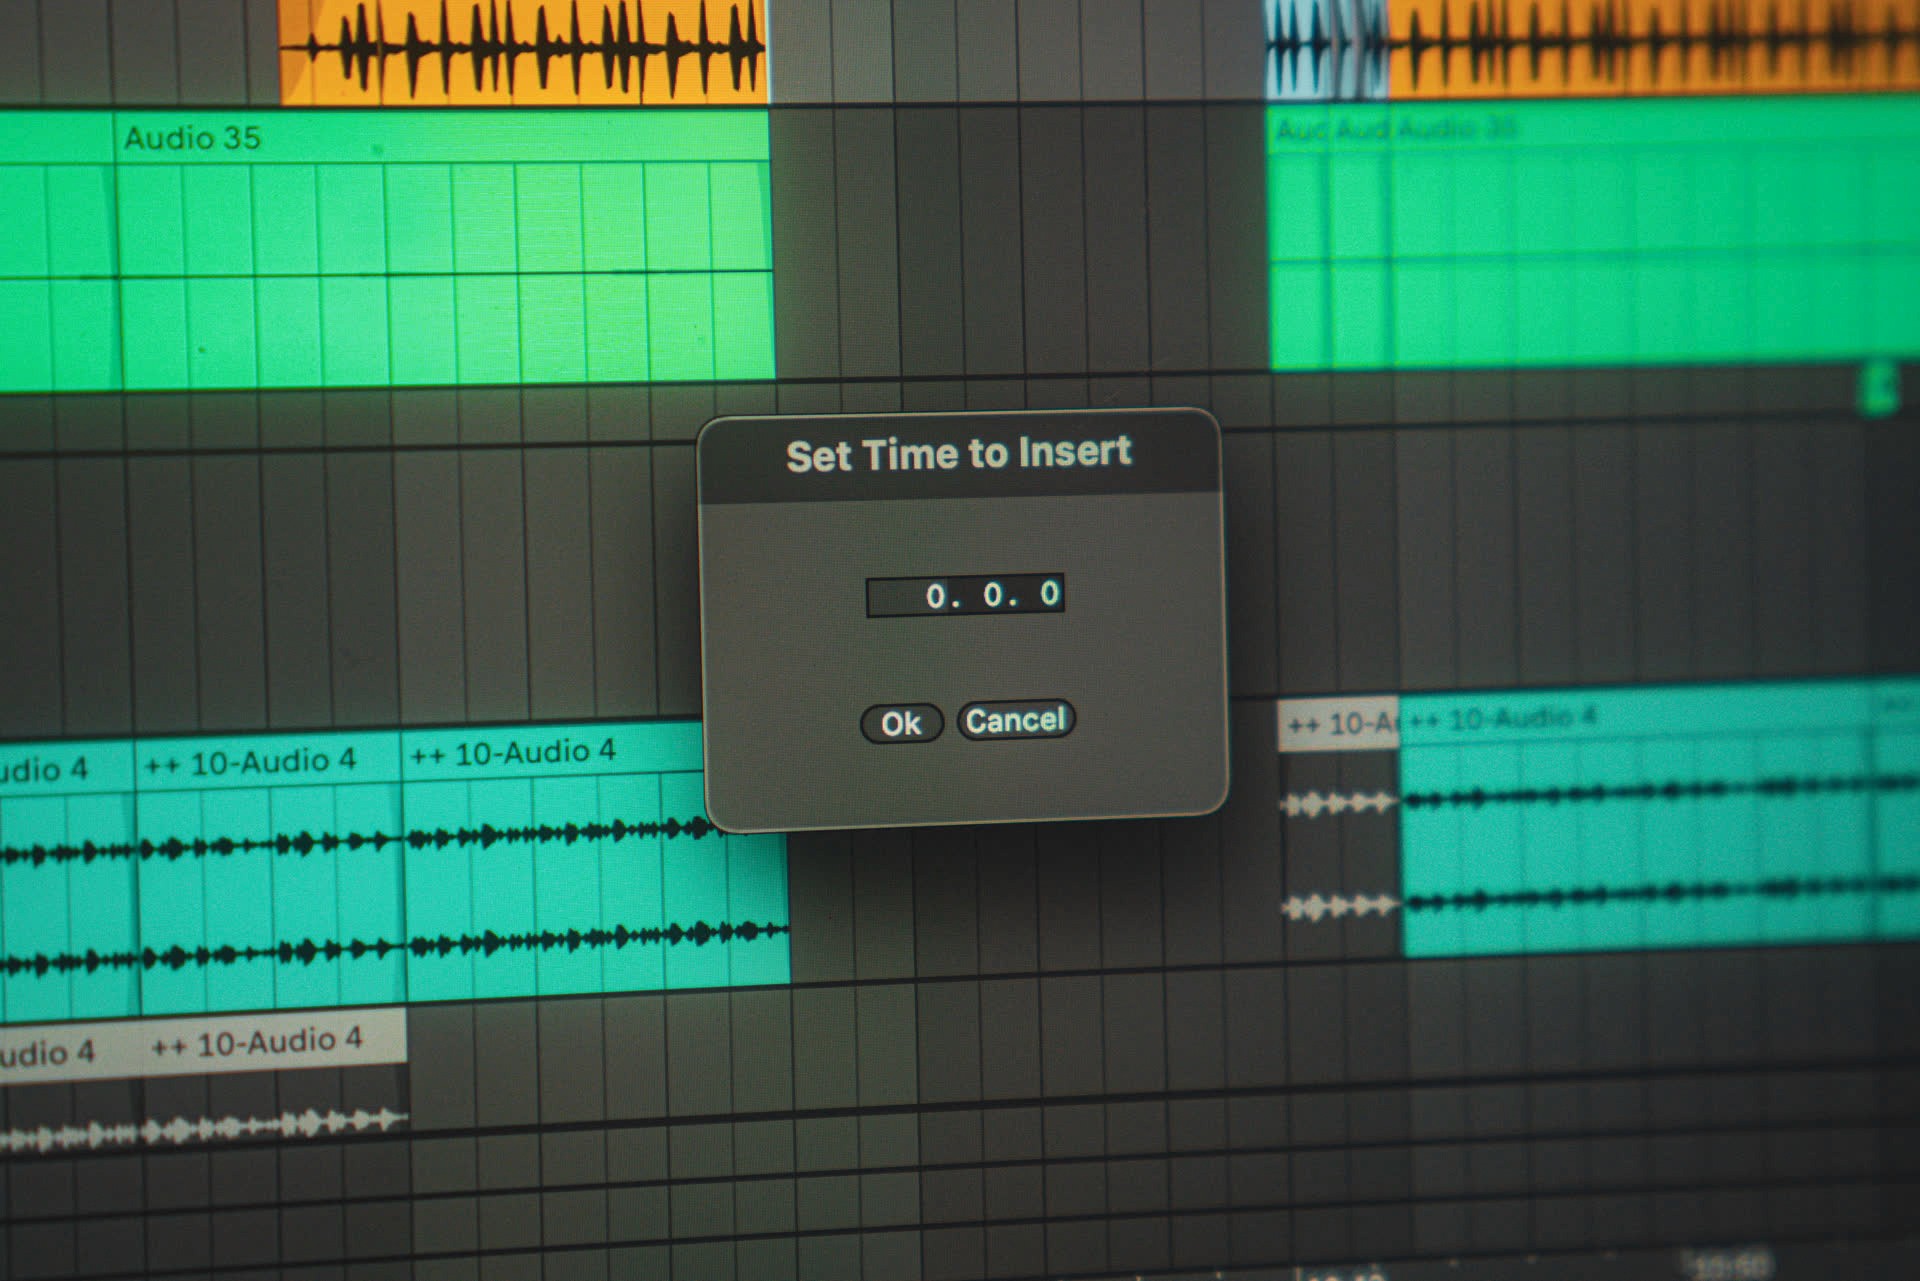
Insert Time
insert time (cmd_i) is a game changer for composition when you first learn it. if you've ever wanted to extend a chorus or add a bridge to a track & didn't know about this shortcut, you know its a pain in the ass to select half your song & nudge it over by a few bars. cmd_i makes this process dead simple.
insert time is fantastic for adding an extra bar before a drop or making room for a new section. it's hard to predict how a song will flow together while it's being built, so the ability to make edits to the compositional sequence after the fact is an important tool to have.
one trick that can help speed up your workflow is to use a selection to determine the number of bars you add without needing the dialog box popping up. for example, if you make a 4 bar selection & press cmd_i, 4 bars will be added to where your selection started & the selected content itself will shift to the right. this might be the more intuitive way to go about adding time to track, especially if you want to make room for just a couple bars.
Delete Time
delete time (cmd_shift_delete) is obviously the opposite of insert time - it removes the selection completely from the timeline. everything will shift over intact, ensuring your tracks still line up nicely.
delete time can remove full sections of a song or just a beat or two. this is an indispensable tool for types of production that don't use the grid, like podcasting & sound design. it's really handy to not have to constantly move clips around when you want to take out a little silence, & delete time does just the trick.
Duplicate Time
duplicate time (cmd_shift_d) is one of the most useful tools on this list, & that's saying something. the concept is pretty straightforward - anything that falls horizontal boundaries of the selection will be copied & placed to the right with added time.
one cool feature of this - if you duplicate a selection that is inside the loop bracket, the loop bracket will expand in size to accommodated the new material. this is terribly useful for adding variation in a loop as it makes it really easy to double your loop & add some subtle changes to the duplicated section.
Cut & Paste Time
there is no copy time, but there is cut time (cmd_shift_x). obviously, this deletes time & adds the deleted content to the clipboard. note that this will copy everything that falls between the selection, not just what happens to be selected vertically. this is key when following it with paste time (cmd_shift_v), which works differently. paste time inserts exactly the amount of time of whatever is in the clipboard & then pastes the clipboard into it. say you have a half bar clip copied to your clipboard. using paste time will insert half a bar wherever you last clicked & paste the clip in the active channel.
unlike cut time, however, paste time does have a drawback: it disregards which tracks the clips in your clipboard were copied from & only keeps their position relative to each other. in other words, it will paste the contents of tracks 1, 2, & 3 in tracks 3, 4, & 5 if track 3 is active. just keep this in mind & select the top track whenever you paste & you'll be fine.
Making Selections
it's fairly common for the time editing tools to require precise selections. often, the selection you want to make is a bit difficult because it is so large horizontally and vertically as well. if you're rearranging your song, you'll need to make sure you're selecting everything, top to bottom, including the master track - you don't want to end up leaving tempo changes & master automation behind when you move your clips. so how do you ensure you're grabbing everything from the top track to the bottom?
I think the easiest way to make a large selection, especially in terms of vertical selection, is via the loop bracket. just make a selection the exact length of the section you want to copy or delete & press cmd_l. the bracket will snap to the length of that section & simply clicking it (the loop bracket) will select everything it contains. just make sure you turn off the loop switch in the top right afterward.
another great way to make a large selection requires just two clicks. image the selection you want to make as a rectangle & click one corner of it. then find the opposite corner, hold shift, & click there. et voila, you've made your selection!
another great way to make a large selection requires just two clicks. image the selection you want to make as a rectangle & click one corner of it. then find the opposite corner, hold shift, & click there. et voila, you've made your selection!
another great way to make a large selection requires just two clicks. image the selection you want to make as a rectangle & click one corner of it. then find the opposite corner, hold shift, & click there. et voila, you've made your selection!
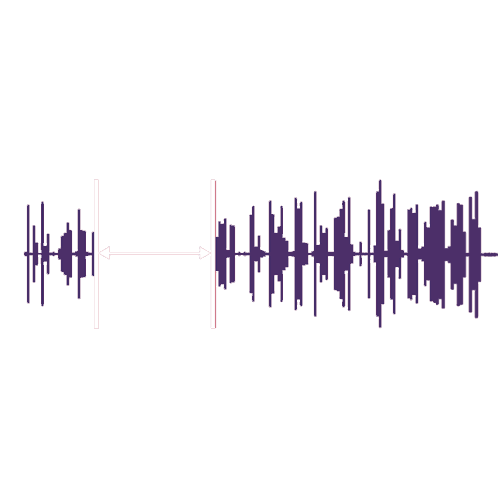
anchor & adjust is a similar technique that's especially useful for making non-standard length selections. start by clicking the side of the sample that aligns with the grid then hold shift & drag to the point you want to select to. in this example, I didn't want any space between the two sounds so I select the start of one (conveniently lined up with the grid) & use the command key to select off the grid all the way up to the end of the previous sound. the delete time shortcut (cmd_shift_delete) then removes the space in between.
anchor & adjust is a similar technique that's especially useful for making non-standard length selections. start by clicking the side of the sample that aligns with the grid then hold shift & drag to the point you want to select to. in this example, I didn't want any space between the two sounds so I select the start of one (conveniently lined up with the grid) & use the command key to select off the grid all the way up to the end of the previous sound. the delete time shortcut (cmd_shift_delete) then removes the space in between.
anchor & adjust is a similar technique that's especially useful for making non-standard length selections. start by clicking the side of the sample that aligns with the grid then hold shift & drag to the point you want to select to. in this example, I didn't want any space between the two sounds so I select the start of one (conveniently lined up with the grid) & use the command key to select off the grid all the way up to the end of the previous sound. the delete time shortcut (cmd_shift_delete) then removes the space in between.
& that's all for time editing techniques & selections! thanks for reading. check out more time-saving tips below:
& that's all for time editing techniques & selections! thanks for reading. check out more time-saving tips below:
& that's all for time editing techniques & selections! thanks for reading. check out more time-saving tips below:


pATCHES © 2024
pATCHES © 2024
